Close Combat
who can fight
Models whose bases are touching are engaged in hand-to-hand combat. This can only happen once a warrior has charged his enemy, as models are otherwise not allowed to move into contact.
All close quarter fighting is worked out in the hand-to-hand combat phase. Regardless of whose turn it is, all models in hand-to-hand combat will fight. A warrior can fight against enemies to his side, front, or rear. In reality the fighters are constantly moving, dodging, and weaving as they struggle to kill their adversaries.
Models fighting in hand-to-hand combat do not shoot in the shooting phase. They are far too busy fighting for their lives. Any very close range shots they are able to make using pistols are treated like close combat weapon attacks (see the Weapons & Armour section).
who strikes first
Normally, models fight in order of descending Initiative with the highest striking first. If their Initiatives are equal, roll a dice to see who strikes first.
If a model stood up in the Recovery phase of that turn, then he will strike last irrespective of any other circumstances.
Sometimes a model will be allowed to ‘strike first’ for some reason. Most commonly this is because they charged in that turn, but some equipment, skills and spells produce the same effect. If only one model ‘strikes first’ then it does so and the remainder of the combatants strike in Initiative order as described above.
If there are several models who are each entitled to ‘strike first’, then they determine the order of combat between themselves by Initiative, as described above. Once all those that were eligible to ‘strike first’ have fought, any other combatants fight in Initiative order.
which models fight
A model can fight if its base is touching the base of an enemy model. Even models attacked from the side or rear can fight.
If a warrior is touching more than one enemy, he can choose which to attack. If he has more than 1 Attack, he can divide them in any way the player wishes, so long as he makes this clear before rolling to hit.
fighting with two weapons
Some maniac warriors carry two weapons, one in each hand, so they can rain a flurry of blows on their enemies. A warrior armed with two one-handed weapons may make 1 extra Attack with the additional weapon. Note that this is added to the total of the warrior’s attacks after other modifiers, such as frenzy, have been applied. If he is armed with two different weapons (sword and dagger, for example), he will make a single attack with whichever weapon he chooses, and all others with the remaining weapon. Roll to hit and wound for each weapon separately.
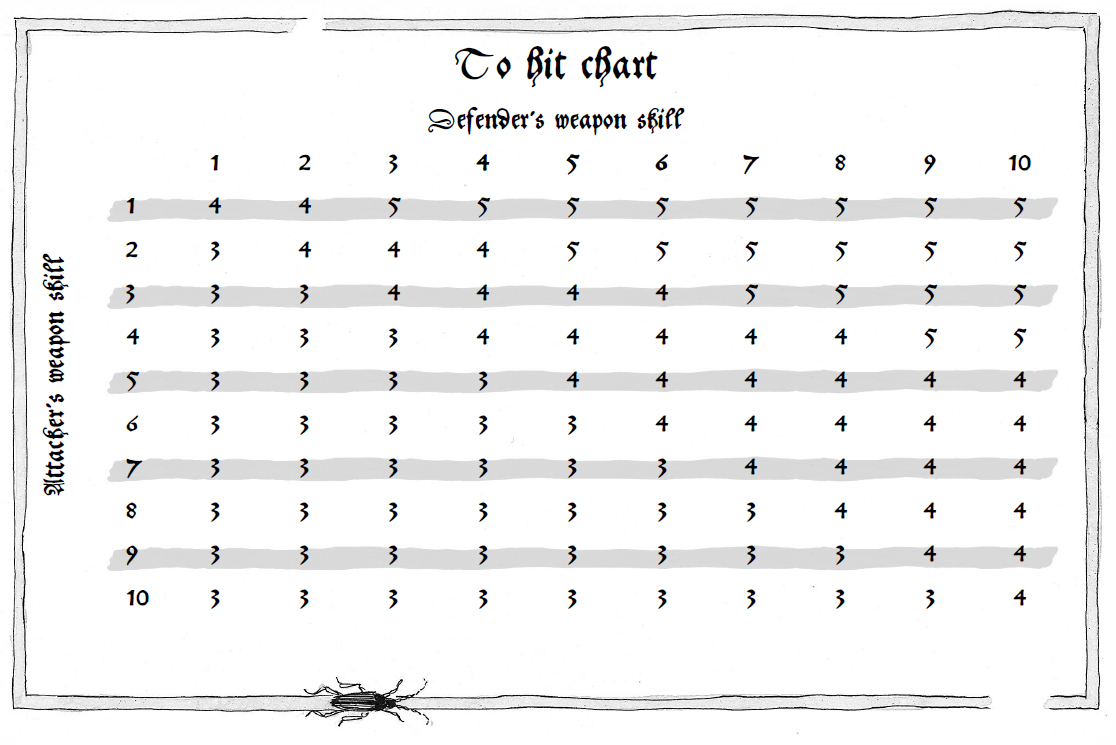
hitting the enemy
To determine whether hits are scored, roll a D6 for each model fighting. If a model has more than 1 Attack roll a D6 for each attack.
The dice roll needed to score a hit on your enemy depends upon the Weapon Skills of the attacker and the foe. Compare the Weapon Skill of the attacker with that of his opponent and consult the To Hit chart below to find the minimum D6 score needed to hit.
Hit Roll
parry
Bucklers are small shields which offer no increase to the armour saving throw, but allow you to parry attacks. Swords are also used to parry enemy attacks.
When an opponent scores a hit, warriors equipped with bucklers or swords may try to parry the blow.
Roll a D6. If the score is higher than the number your opponent rolled to hit, the buckler or sword has parried the strike. Note that it is therefore impossible to parry a blow which scored a 6 on the roll to hit.
A buckler or sword may only parry one blow per hand-to-hand combat phase. A parried blow is ignored and has no effect. If your opponent scored several hits, you will have to try to beat the highest score (if the highest score is a 6, you automatically lose the chance of parrying that opponent’s attacks). If a model is fighting against several opponents, it may only parry the strike from the enemy who makes the first hit(s) (ie, the attacking model with the highest Initiative). In the case of equal Initiative characteristics roll a dice to decide who strikes first.
If your model is armed with a buckler and a sword, you may re-roll any failed parries once. A model armed with two swords can still only roll once.
A model may not parry attacks made with twice (or more) his own basic Strength – they are simply too powerful to be stopped.
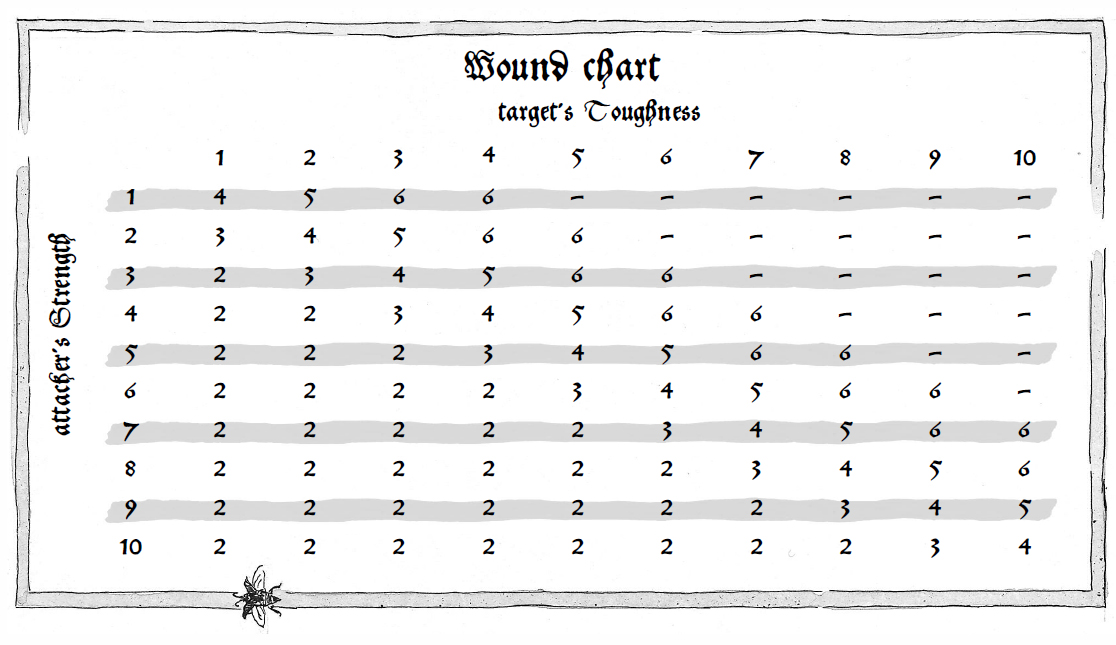
roll to wound
Once your model has hit a target you must test to see whether a wound is inflicted. Sometimes a strike may fail to wound simply because it causes an insignificant injury or glances off the enemy’s equipment.
To determine whether the blow has caused a wound compare the Strength of the attacker with the Toughness of the target. You will find a complete description of the various weapons together with their Strength values and special rules in the Weapons & Armour section.
The chart below shows the D6 score required to turn a hit into a wound Note that a dash (–) means that there is no chance of wounding the target.
wound chart
weapon modifiers
Unlike hits from shooting, the Strength of the attacker is used to determine wounds, rather than that of the weapon itself. However, some weapons confer a bonus on the attacker’s Strength (see the Weapons & Armour section for full details).
critical hits
If you roll a 6 when rolling to wound (for hand-to-hand combat and shooting only) you will cause a critical hit. Roll a D6 and consult the Critical Hit chart below to determine the damage caused by the critical hit. You should also roll to see whether the target makes its armour save or suffers damage as normal.
In addition, if the attacker normally needs 6s to wound his target, he cannot cause a critical hit. His opponent is simply too tough to suffer a serious injury at the hands of such a puny creature!
Each warrior may only cause one critical hit in each hand-to-hand combat phase (see the Close Combat section), so if he has several attacks, the first 6 you roll to wound will cause a critical hit.
critical hit chart
| D6 | Result |
|---|---|
| 1-2 | Hits a vital part. The wound is doubled to 2 wounds. Roll any armour saves before doubling the wound. |
| 3-4 | Hits an exposed spot. The wound is doubled to 2 wounds. The attack ignores all armour saves. |
| 5-6 | Master strike! The wound is doubled to 2 wounds. The attack ignores all armour saves. You gain +2 to any Injury rolls. |
If a critical hit causes more than 1 wound, and the weapon the attacking model is using normally causes several wounds, then use the one that causes the most damage.
armour
Combatants that are wounded have the chance to avoid damage if they are wearing armour or carrying shields. This is exactly the same as described for shooting, and the same rules apply.
For each wound suffered the player rolls a D6. If he rolls greater than or equal to the armour save of his fighter then that wound has been absorbed or deflected by the armour.
armour save modifiers
Some models are so powerful that armour provides less protection against them.
The higher a creature’s Strength the more easily it can pierce armour. The following chart shows the reduction in the enemy’s armour saving throw caused by the attacker’s Strength.
| Strength | Save modifier |
|---|---|
| 1-3 | None |
| 4 | -1 |
| 5 | -2 |
| 6 | -3 |
| 7 | -4 |
| 8 | -5 |
| 9+ | -6 |
Some weapons also confer a bonus to the user’s Strength, making it more likely that any hits will pierce the opponent’s armour. These bonuses are given in the Weapons & Armour section.
WARD SAVES
Some troops types and creatures are protected by more than mere physical armour. They may be shielded by magical charms or blessings, given protection by the gods of the Warhammer world, or perhaps they are just astoundingly lucky.
Models with this sort of protection are referred to as having a Ward save or Ward. This type of save is quite different from an armour save and it is very important to understand the difference from the beginning.
Wards represent magical or divine protection which can save a warrior when armour would be of no use at all. Unlike an armour save, a Ward is never modified by Strength modifiers, etc. Even if a hit ignores all armour saves, a model with a Ward may still try to take its Ward save as normal. A model may only ever take one Ward save against each wound it has suffered.
Sometimes a model has both an armour save and a Ward save. In this case, the model must take the armour save first and, if it is failed, the model is allowed to try to make a Ward save. No model can ever try to make more than one Ward save against a wound it has suffered. If a model has two Ward saves for any reason, use the better Ward save.
The above is copied from the 6th edition Warhammer Fantasy rulebook. Mordheim was released during 5th edition and did not include ward saves. Later warbands however, were released during 6th edition and referred to special saves as Ward saves.
injuries
Most warriors have a Wounds characteristic of 1, but some have a value of 2 or more. If the target has more than 1 wound then deduct 1 from his total each time he suffers a wound. Make a note on the roster sheet. So long as the model has at least 1 wound remaining he may continue to fight.
As soon as a fighter’s Wounds are reduced to zero, roll to determine the extent of his injuries. The player who inflicted the wound rolls a D6 for the wound that reduced the model to zero wounds and for every wound the model receives after that. If a model suffers several wounds in one turn, roll once for each of them and apply the highest result.
| D6 | Result |
|---|---|
| 1-2 | Knocked down. The force of the blow knocks the warrior down. Place the model face up to show that he has been knocked down. |
| 3-4 | Stunned. The target falls to the ground where he lies wounded and barely conscious. Turn the model face down to show that he has been stunned. |
| 5-6 | Out of action. The target has been badly hurt and falls to the ground unconscious. He takes no further part in the game and is immediately removed from the battle. |
For the full effects of knocked down or stunned, see the wounds and injuries section
attacking stunned and knocked down warriors in hand-to-hand combat
warriors knocked down
If an enemy is fighting a warrior who is knocked down, he may attack him to put him out of his misery. All attacks against a warrior who is knocked down hit automatically. If any of the attacks wound the knocked down model and he fails his armour save, he is automatically taken out of action as explained previously. A knocked down model may not parry.
warriors stunned
A stunned warrior is at the mercy of his enemies. A stunned model is automatically taken out of action if an enemy can attack him in hand-to-hand combat.
Note that a model with multiple attacks may not stun/knock down and then automatically take a warrior out of action during the same hand-to-hand combat phase. The only way you can achieve this is to have more than one of your models attacking the same enemy. So, if the enemy is stunned/knocked down by the first warrior, he can be hit and put out of action by the next warrior to attack.
If your model is engaged in close combat with an enemy who is still standing, he cannot attack any other models that are stunned or knocked down, since in reality they will not pose an immediate threat to him and their companions will try to protect them.
moving from combat
Once models are engaged in hand-to-hand combat they cannot move away during their movement phase. They must fight until they are either taken out of action, until they take out their enemies, or until one or the other breaks and runs.
The exception to this rule is that if all a model’s close combat opponents are knocked down or stunned, he may move away from the combat if you wish, and even charge other enemies within range.
breaking from combat
A warrior who panics whilst fighting in hand-to-hand combat will break off and make a run for it as described in the Leadership & Psychology section.
When a fighter breaks from combat he simply turns and runs off. His opponents automatically hit the warrior as he breaks, each inflicting 1 hit which is worked out immediately.
Note that warriors cannot choose to leave a fight voluntarily.